Si has seguido la primera parte del tutorial ya deberías tener una theme child personalizado, que va a ser la base sobre la que trabajaremos ahora, por lo que si no has seguido nuestro tutorial te recomendamos encarecidamente que vayas a la primera parte.
¿Por qué flexibilizar una plantilla?
Para que podamos entender cómo funciona una plantilla dinámica supongamos que quermos crear un portafolio en nuestra web. Todos nuestros proyectos tendrían el mismo tamaño y las mismas secciones. Si quisiésemos tener proyectos de diversos tamaños (grandes, medianos y pequeños) necesitaríamos tener diferentes plantillas para cada tamaño.
Sin embargo, lo que podemos hacer es crear una plantilla dinámica en la que , mediante un desplegable, podamos elegir el tamaño del proyecto. Esto no solo será más sencillo para el usuario al mejorar el UX sino que además nos ayudará en su mantenimiento puesto que solo tendremos que inspeccionar un solo template.
¿Qué plantillas deberían ser dinámicas?
Antes de empezar tenemos que tener en cuenta que no todas las plantillas tienen la necesidad de ser dinámicas, si por ejemplo, tu página va a realizar una sola cosa no tenemos la necesidad de agregar una lógica extra a nuestra template.
Como ejemplo en nuestro tutorial crearemos una plantilla para la página de formulario, pero como base crearemos una plantilla dinámica general.
Creando nuestro template dinámico
Primero crearemos un template dinámico que nos ayude a visualizar como funcionan las distintas partes que la componen. Para manejar la template se crearán unos controles específicos que se mostrarán en el edito de página.
Estos controles serán inputs de un formulario, por lo que podrán ser:
- Cajas de texto
- Textarea
- Selects
- Radio buttons
- Checkbox
A la hora de crear nuestro template nos basaremos en hooks (ganchos) que nos permitirán modificar el código de wordpress sin la necesidad de modificar los archivos propios de wordpress, algo no demasiado aconsejable dado que lo perderíamos con cada actualización de wordpress.
Para mostrar nuestros controles en la edición de páginas utilizaremos la función child init() que creamos en la primera parte para agregar los enlaces a load-post.php y load-post-new.php.
<?php

add_action( 'load-post.php', array( $this, 'page_template_meta_box' ) );

add_action( 'load-post-new.php', array( $this, 'page_template_meta_box' ) );

add_action( 'save_post', array( $this, 'save_page_template_meta' ), 10, 2 );

}
Usamos estos dos hooks para que nuestros controles se muestren tanto cuando creamos una nueva página (load-post-new.php) como cuando la editamos (load-post.php. Por otra parte el hook save_post guardará los datos que se generen al modificar los controles.
Agregue los siguientes cuatro métodos de clase para crear, visualizar y guardar datos para el cuadro meta.
/* Add meta box hook. */
public function page_template_meta_box() {
  add_action( 'add_meta_boxes', array( $this, 'add_page_template_meta_box' ) );
}
/* Register meta box. */
public function add_page_template_meta_box() {
  add_meta_box(
    'page-template-meta-box',
    esc_html__( 'Page Template Meta Box', 'twenty-seventeen-child' ),
    array( $this, 'display_page_template_meta_box' ),
    'page',
    'side',
    'default'
  );
}
/* Render meta box on the page editor. */
public function display_page_template_meta_box($object) {
  wp_nonce_field( basename( __FILE__ ), 'page_template_meta_box_nonce' );
}
No entraremos en muchos detalles sobre el código pero para que comprendas un poco más su funcionamiento:
- El código page_template_meta_box() y el de add_page_template_meta_box() registrarán nuestra metabox en WordPress.
- Con add_page_template_meta_box (), el parámetro ‘page’ especifica que este meta box solo se mostrará en el editor de tipo de publicación ‘page’ en el administrador de WordPress.
- El método de clase display_page_template_meta_box () representa el meta box y configura los controles para que sean más seguros.
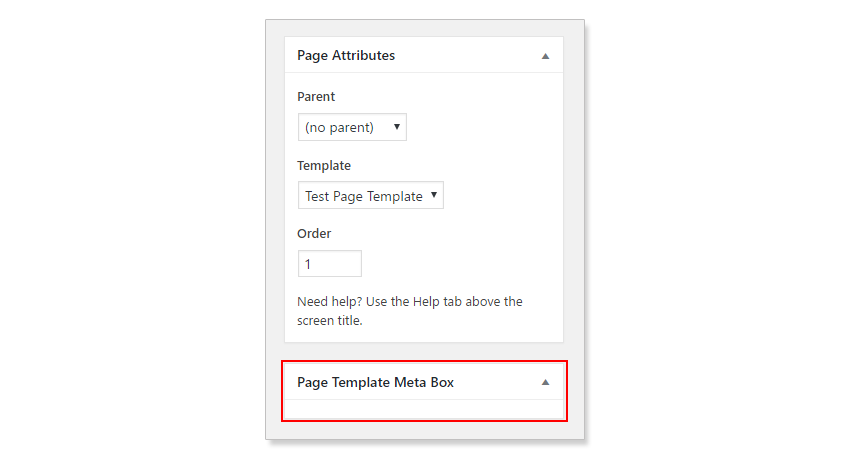
Si has seguido el tutorial, y no ha habido problemas, deberías de tener una metabox similar a esta en el editor de páginas.

Ahora nuestra metabox está vacía pero pronto añadiremos nuevos controles.
Añadiendo controles al metabox
Para añadir nuestros controles al metaboz debemos empezar añadiendo el siguiente código a la funcion display_page_template_meta_box ()
<?php
$text = get_post_meta( $object->ID, 'page_template_text', true );
$textarea = get_post_meta( $object->ID, 'page_template_textarea', true );
$checkbox = get_post_meta( $object->ID, 'page_template_chk', true );
$radio = get_post_meta( $object->ID, 'page_template_radio', true );
$select = get_post_meta( $object->ID, 'page_template_select', true );
Este código almacena los valores de nuestros controles en variables locales. Una vez creadas estas variables debemos incluir este código para que se muestren nuestros controles.
?> <div> <p> <label for="page-template-text"><?php _e( "Text Control", 'twenty-seventeen-child' ); ?></label><br> <input class="widefat" type="text" name="page-template-text" id="page-template-text" value="<?php echo esc_attr( $text ); ?>" /> </p> <p> <label for="page-template-textarea"><?php _e( "Textarea Control", 'twenty-seventeen-child' ); ?></label><br> <textarea rows="5" class="widefat" name="page-template-textarea" id="page-template-textarea"><?php echo esc_attr( $textarea ); ?></textarea> </p> <p> <input type="checkbox" name="page-template-chk" id="page-template-chk" value="1" <?php checked($checkbox, true); ?> /> <label for="page-template-chk"><?php _e( "Checkbox Control", 'twenty-seventeen-child' ); ?></label><br> </p> <p> <label for="page-template-align"><?php _e( "Radio Button Control", 'twenty-seventeen-child' ); ?></label><br> <input type="radio" name="page-template-align" id="rdo-left" value="left" <?php checked( $radio, 'left' ); ?> ><label for="rdo-left"><?php _e( 'Left', 'twenty-seventeen-child' ); ?></label><br> <input type="radio" name="page-template-align" id="rdo-right" value="right" <?php checked( $radio, 'right' ); ?> ><label for="rdo-right"><?php _e( 'Right', 'twenty-seventeen-child' ); ?></label><br> <input type="radio" name="page-template-align" id="rdo-center" value="center" <?php checked( $radio, 'center' ); ?> ><label for="rdo-center"><?php _e( 'Center', 'twenty-seventeen-child' ); ?></label><br> </p> <p> <label for="page-template-select">Dropdown</label> <select name="page-template-select" class="widefat"> <option value='one' <?php selected( 'one', $select ); ?>><?php _e( 'One', 'twenty-seventeen-child' ); ?></option> <option value='two' <?php selected( 'two', $select ); ?>><?php _e( 'Two', 'twenty-seventeen-child' ); ?></option> <option value='three' <?php selected( 'three', $select ); ?>><?php _e( 'Three', 'twenty-seventeen-child' ); ?></option> <option value='four' <?php selected( 'four', $select ); ?>><?php _e( 'Four', 'twenty-seventeen-child' ); ?></option> </select> </p> </div><?php
Todos nuestros controles se encuntran englobados dentro de una etiqueta, y su valor será actualizado en las variables locales que habíamos creado. De esta manera los valores de nuestra metabox se almacenarán de manera segura.
Para ello, debemos guardar los datos actuales de nuestra metabox en la base de datos de WordPress.
En nuestro anterior código creamos un hook para crear una clase cada vez que se actualiza un de nuestras páginas. Agreguemos ese hook a nuestro child theme ahora.
<?php
/* Save meta box data. */
public function save_page_template_meta( $post_id, $post ) {

    if ( ! ( isset( $_POST[ 'page_template_meta_box_nonce' ] ) && wp_verify_nonce( $_POST[ 'page_template_meta_box_nonce' ], basename( __FILE__ ) ) ) ) {
        return $post_id;
    }

    if ( ! current_user_can( 'edit_post', $post_id ) ) {
        return $post_id;
    }

    if( 'page' != $post->post_type ) {
        return $post_id;
    }

    $page_template_text_value = isset( $_POST[ 'page-template-text' ] ) ? $_POST[ 'page-template-text' ] : '';
    update_post_meta( $post_id, 'page_template_text', $page_template_text_value );

    $page_template_textarea_value = isset( $_POST[ 'page-template-textarea' ] ) ? $_POST[ 'page-template-textarea' ] : '';
    update_post_meta( $post_id, 'page_template_textarea', $page_template_textarea_value );

    $page_template_chk_value = isset( $_POST[ 'page-template-chk' ] ) ? $_POST[ 'page-template-chk' ] : '';
    update_post_meta( $post_id, 'page_template_chk', $page_template_chk_value );

    $page_template_radio_value = isset( $_POST[ 'page-template-align' ] ) ? $_POST[ 'page-template-align' ] : '';
    update_post_meta( $post_id, 'page_template_radio', $page_template_radio_value );

    $page_template_select_value = isset( $_POST[ 'page-template-select' ]) ? $_POST[ 'page-template-select' ] : '';
    update_post_meta( $post_id, 'page_template_select', $page_template_select_value );
}
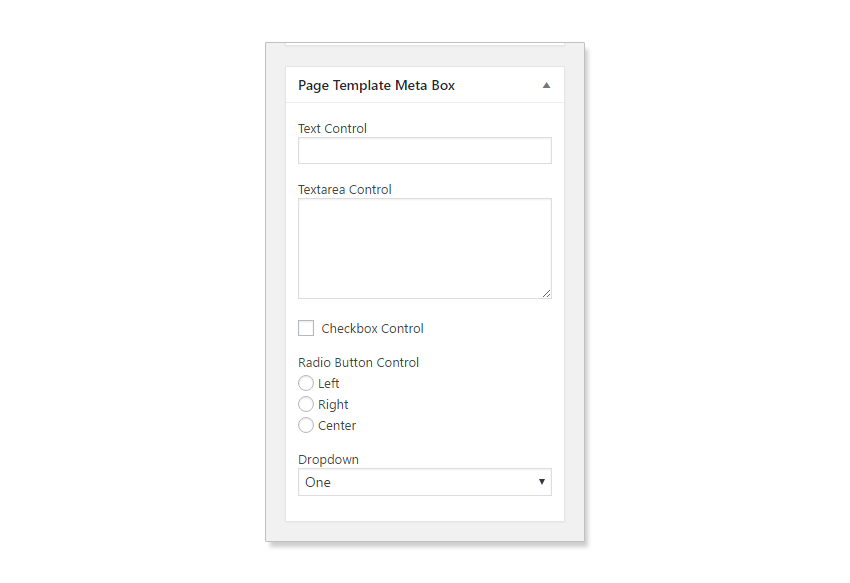
Una vez añadido nuestro código la metabox deberá verse así:

El código completo de nuestro functions.php deberá de verse así:
<?php
/**
* Twenty Seventeen child theme class.
*
* DPT = D[ynamic] P[age] T[emplates].
*/
class DPT_Twenty_Seventeen_Child {
/**
* Register hooks.
*/
public function init() {
add_action( 'wp_enqueue_scripts', array( $this, 'enqueue_parent_theme_styles' ) );
add_action( 'load-post.php', array( $this, 'page_template_meta_box' ) );
add_action( 'load-post-new.php', array( $this, 'page_template_meta_box' ) );
add_action( 'save_post', array( $this, 'save_page_template_meta' ), 10, 2 );
}
/* Enqueue parent theme styles. */
public function enqueue_parent_theme_styles() {
wp_enqueue_style( 'twenty-seventeen-css', get_template_directory_uri() . '/style.css' );
}
/* Add meta box hook. */
public function page_template_meta_box() {
add_action( 'add_meta_boxes', array( $this, 'add_page_template_meta_box' ) );
}
/* Register meta box. */
public function add_page_template_meta_box() {
add_meta_box(
'page-template-meta-box',
esc_html__( 'Page Template Meta Box', 'twenty-seventeen-child' ),
array( $this, 'display_page_template_meta_box' ),
'page',
'side',
'default'
);
}
/* Render meta box on the page editor. */
public function display_page_template_meta_box( $object ) {
wp_nonce_field( basename( __FILE__ ), 'page_template_meta_box_nonce' );
$text = get_post_meta( $object->ID, 'page_template_text', true );
$textarea = get_post_meta( $object->ID, 'page_template_textarea', true );
$checkbox = get_post_meta( $object->ID, 'page_template_chk', true );
$radio = get_post_meta( $object->ID, 'page_template_radio', true );
$select = get_post_meta( $object->ID, 'page_template_select', true );
?>
<div>
<p>
<label for="page-template-text"><?php _e( "Text Control", 'twenty-seventeen-child' ); ?></label><br>
<input class="widefat" type="text" name="page-template-text" id="page-template-text" value="<?php echo esc_attr( $text ); ?>" />
</p>
<p>
<label for="page-template-textarea"><?php _e( "Textarea Control", 'twenty-seventeen-child' ); ?></label><br>
<textarea rows="5" class="widefat" name="page-template-textarea" id="page-template-textarea"><?php echo esc_attr( $textarea ); ?></textarea>
</p>
<p>
<input type="checkbox" name="page-template-chk" id="page-template-chk" value="1" <?php checked($checkbox, true); ?> /> <label for="page-template-chk"><?php _e( "Checkbox Control", 'twenty-seventeen-child' ); ?></label><br>
</p>
<p>
<label for="page-template-align"><?php _e( "Radio Button Control", 'twenty-seventeen-child' ); ?></label><br>
<input type="radio" name="page-template-align" id="rdo-left" value="left" <?php checked( $radio, 'left' ); ?> ><label for="rdo-left"><?php _e( 'Left', 'twenty-seventeen-child' ); ?></label><br>
<input type="radio" name="page-template-align" id="rdo-right" value="right" <?php checked( $radio, 'right' ); ?> ><label for="rdo-right"><?php _e( 'Right', 'twenty-seventeen-child' ); ?></label><br>
<input type="radio" name="page-template-align" id="rdo-center" value="center" <?php checked( $radio, 'center' ); ?> ><label for="rdo-center"><?php _e( 'Center', 'twenty-seventeen-child' ); ?></label><br>
</p>
<p>
<label for="page-template-select">Dropdown</label>
<select name="page-template-select" class="widefat">
<option value='one' <?php selected( 'one', $select ); ?>><?php _e( 'One', 'twenty-seventeen-child' ); ?></option>
<option value='two' <?php selected( 'two', $select ); ?>><?php _e( 'Two', 'twenty-seventeen-child' ); ?></option>
<option value='three' <?php selected( 'three', $select ); ?>><?php _e( 'Three', 'twenty-seventeen-child' ); ?></option>
<option value='four' <?php selected( 'four', $select ); ?>><?php _e( 'Four', 'twenty-seventeen-child' ); ?></option>
</select>
</p>
</div><?php
}
/* Save meta box data. */
public function save_page_template_meta( $post_id, $post ) {
if ( ! ( isset( $_POST[ 'page_template_meta_box_nonce' ] ) && wp_verify_nonce( $_POST[ 'page_template_meta_box_nonce' ], basename( __FILE__ ) ) ) ) {
return $post_id;
}
if ( ! current_user_can( 'edit_post', $post_id ) ) {
return $post_id;
}
if( 'page' != $post->post_type ) {
return $post_id;
}
$page_template_text_value = isset( $_POST[ 'page-template-text' ] ) ? $_POST[ 'page-template-text' ] : '';
update_post_meta( $post_id, 'page_template_text', $page_template_text_value );
$page_template_textarea_value = isset( $_POST[ 'page-template-textarea' ] ) ? $_POST[ 'page-template-textarea' ] : '';
update_post_meta( $post_id, 'page_template_textarea', $page_template_textarea_value );
$page_template_chk_value = isset( $_POST[ 'page-template-chk' ] ) ? $_POST[ 'page-template-chk' ] : '';
update_post_meta( $post_id, 'page_template_chk', $page_template_chk_value );
$page_template_radio_value = isset( $_POST[ 'page-template-align' ] ) ? $_POST[ 'page-template-align' ] : '';
update_post_meta( $post_id, 'page_template_radio', $page_template_radio_value );
$page_template_select_value = isset( $_POST[ 'page-template-select' ]) ? $_POST[ 'page-template-select' ] : '';
update_post_meta( $post_id, 'page_template_select', $page_template_select_value );
}
}
$ts_child_theme = new DPT_Twenty_Seventeen_Child();
$ts_child_theme->init();
Para finalizar debemos actualizar nuestra plantilla test-page-template.php muestre los datos que se han introducido en nuestra metabox, para ello debemos incluir el siguiente código.
<?php
/**
 * Template Name: Test Page Template
 *
 * @package WordPress
 * @subpackage Twenty_Seventeen
 * @since 1.0
 */

get_header(); ?>

<div class="wrap">
    <div id="primary" class="content-area">
        <main id="main" class="site-main" role="main">

            <?php
            while ( have_posts() ) : the_post();

                $text = get_post_meta( get_the_ID(), 'page_template_text', true );
                $textarea = get_post_meta( get_the_ID(), 'page_template_textarea', true );
                $checkbox = get_post_meta( get_the_ID(), 'page_template_chk', true );
                $radio = get_post_meta( get_the_ID(), 'page_template_radio', true );
                $select = get_post_meta( get_the_ID(), 'page_template_select', true );

                echo "<p>Text Box: " . $text . "</p>";
                echo "<p>Text Area: " . $textarea . "</p>";
                echo "<p>Checkbox: " . $checkbox . "</p>";
                echo "<p>Radio Buttons: " . $radio . "</p>";
                echo "<p>Dropdown: " . $select . "</p>";

                echo "<h2>Sitemap</h2>";
                echo "<ul>" . wp_list_pages( array( 'title_li' => '' ) ) . "</ul>";

            endwhile; // End of the loop.
            ?>

        </main><!-- #main -->
    </div><!-- #primary -->
</div><!-- .wrap -->

<?php get_footer();
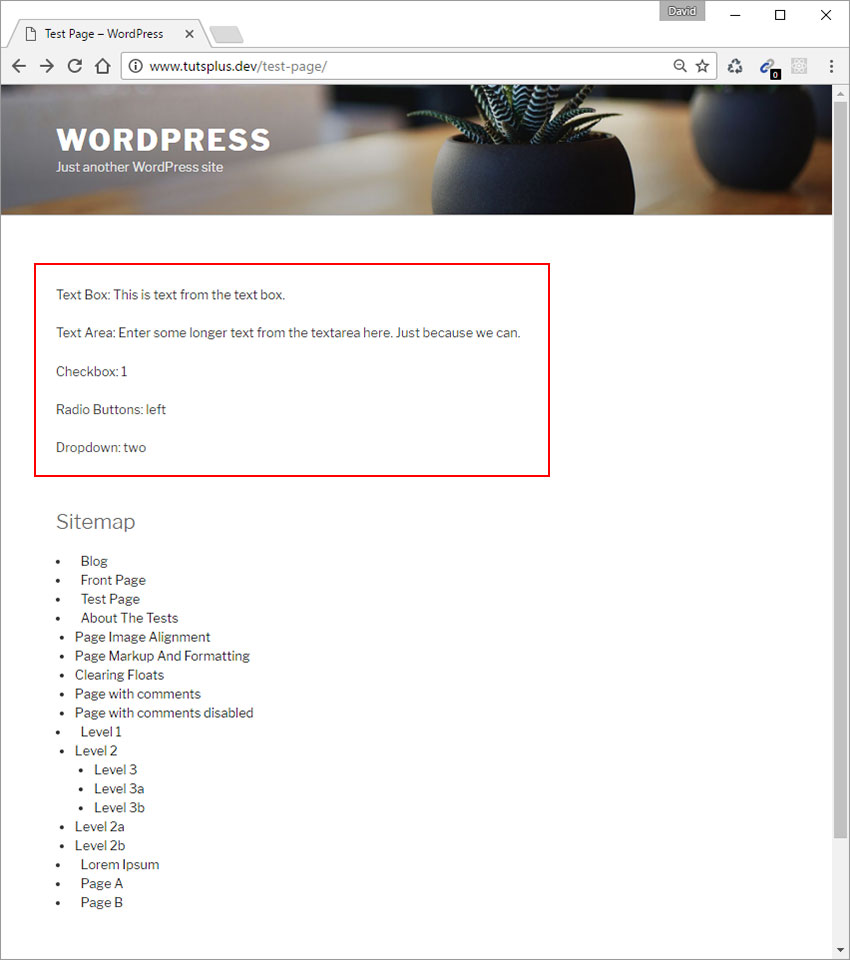
Si todo ha ido bien, los datos que hayas introducido en tu metabox deberá de verse así.

Ahora mismo tenemos en nuestra plantilla los valores del metabox, en nuestro próximo tutorial explicaremos como podemos utilizar estos valores para modificar nuestra página.
Para terminar
Si has seguido todo el tutorial paso a paso, habrás podido crear una plantilla dinámica totalmente funcional, pero lo cierto es que no es demasiado útil.
En nuestro próximo tutorial aprenderás como hacer que esta plantilla sea funcional y de verdadera utilidad.
Visto en : tut plus


